
How To Stain A Cedar Deck
The Sand & Stain System
(2 of 3)
In case you missed it, here’s: How To Sand A Cedar Deck—Part 1 of the Sand & Stain System.
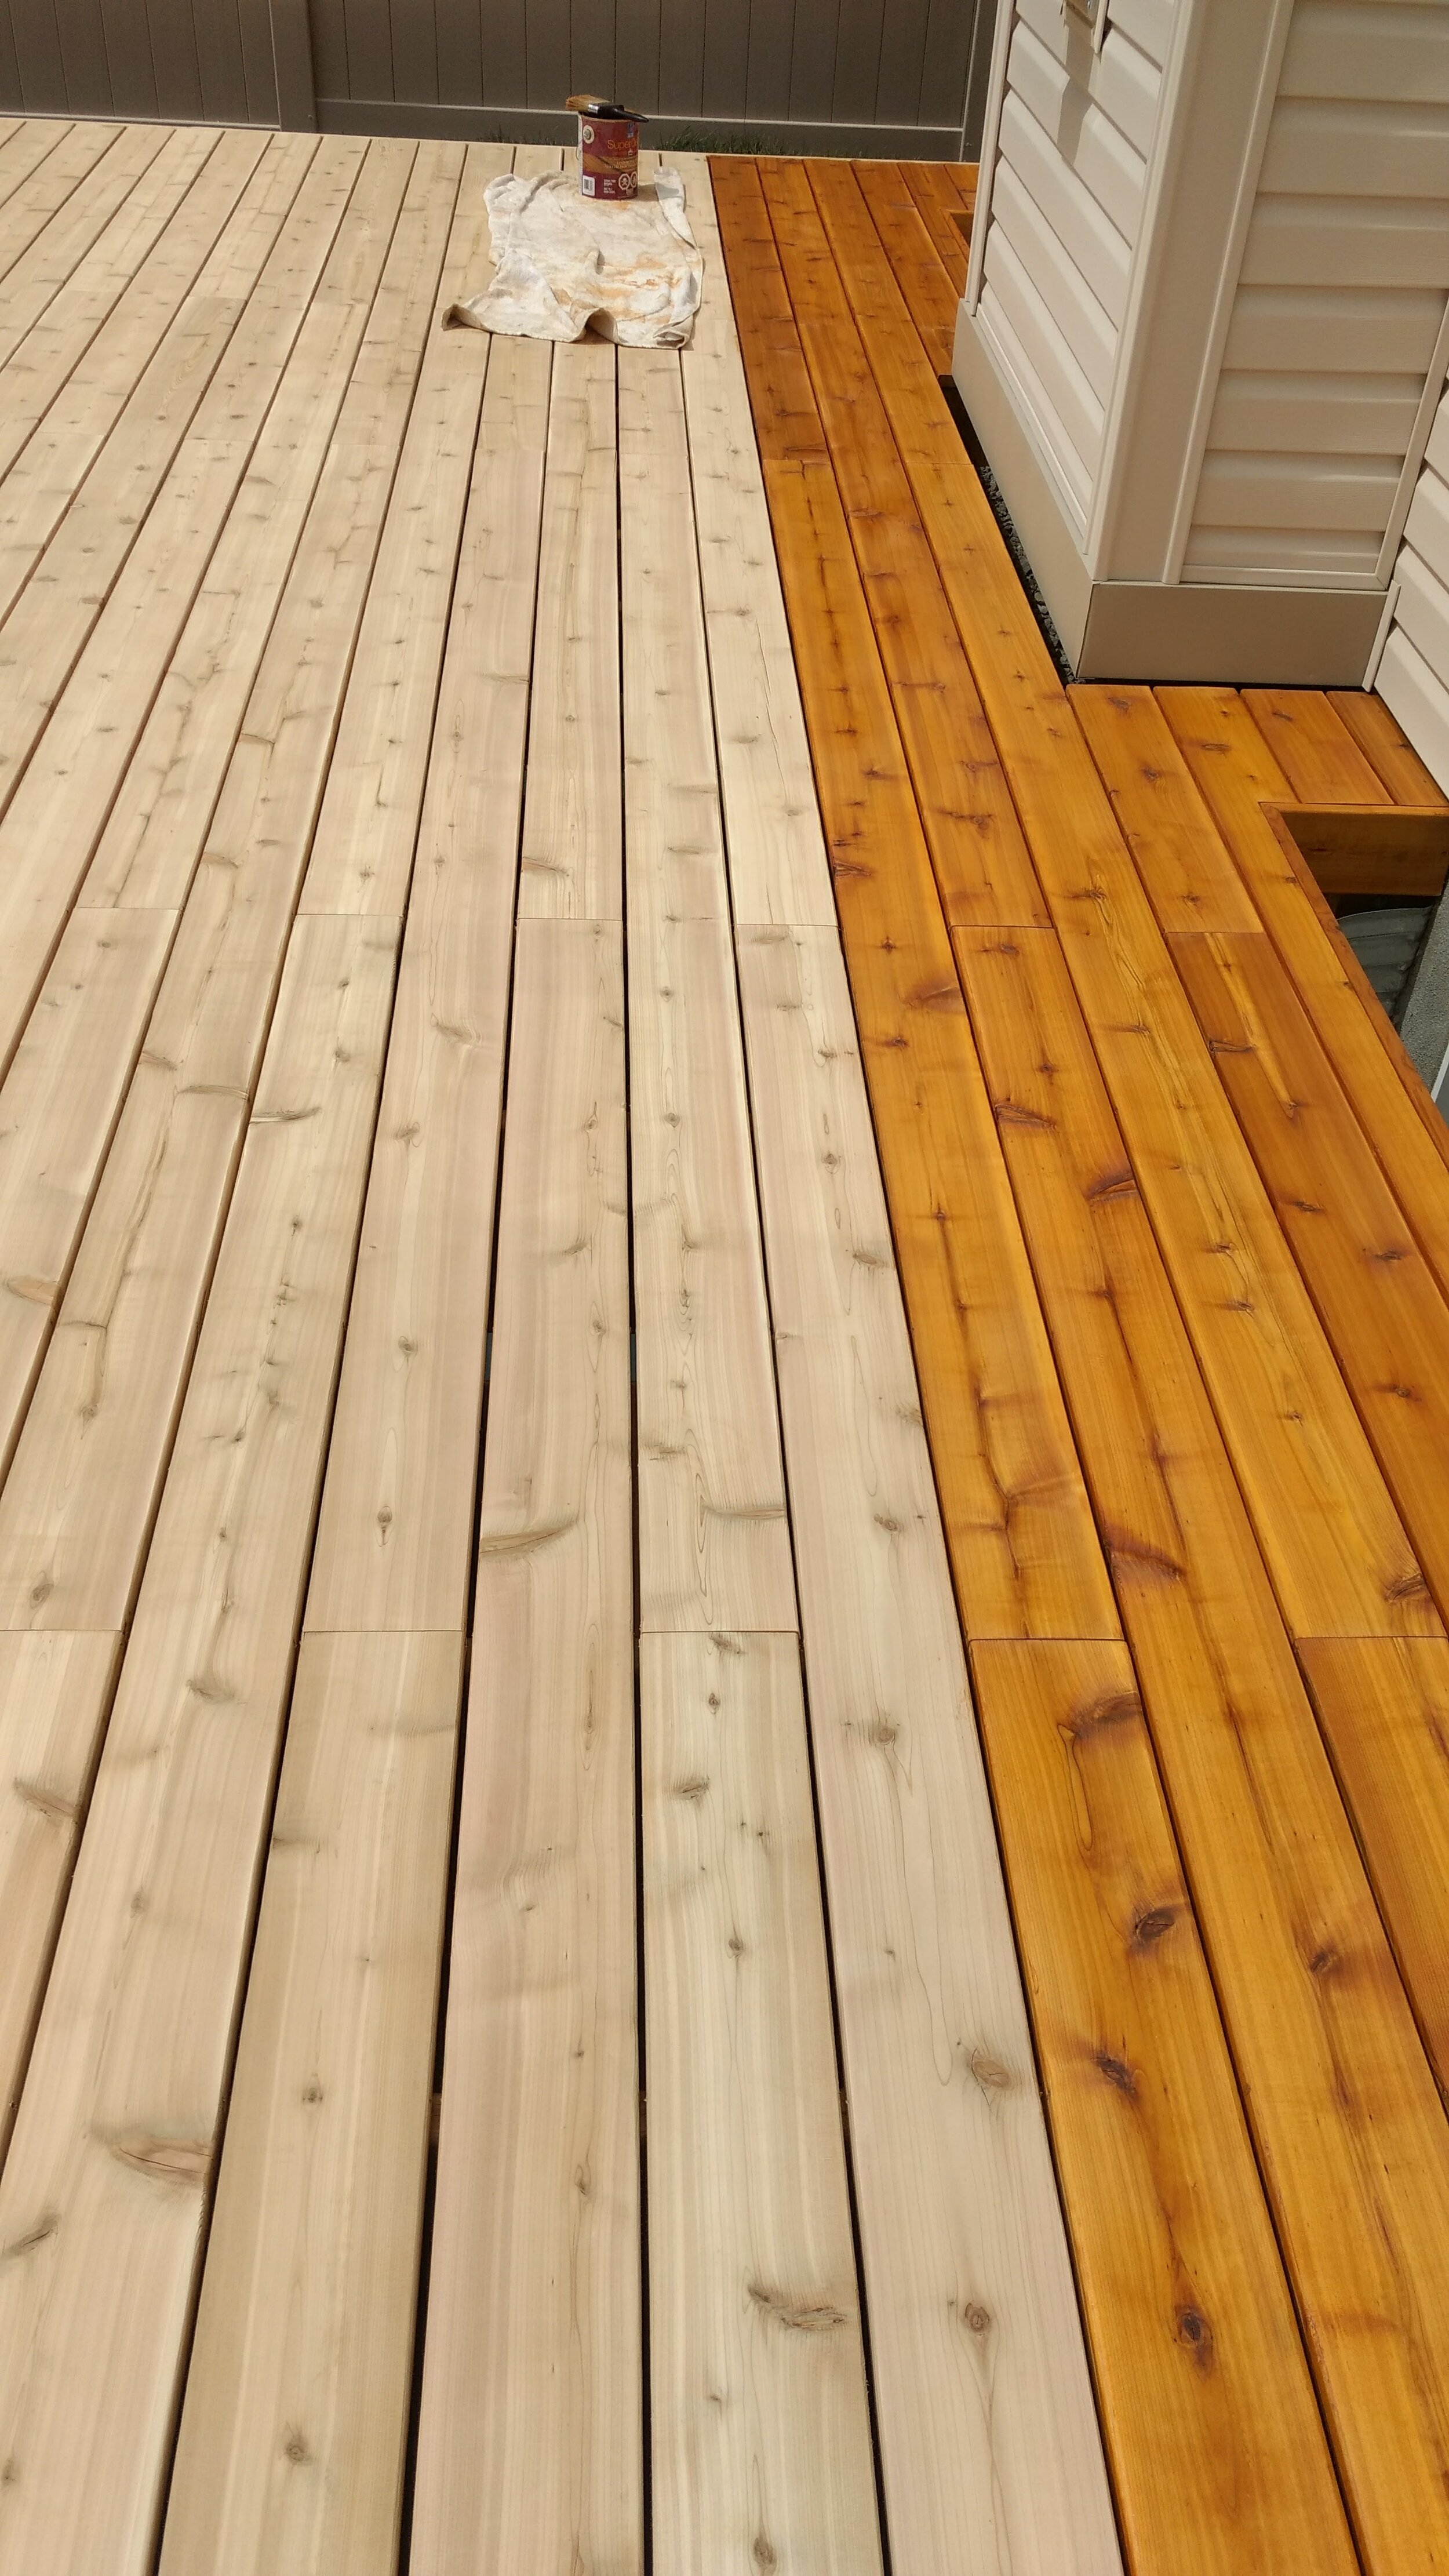
The deck has fully been prepped. Sanding is complete, and so the only thing left to do is the most satisfying step: finishing with your colour of choice for protection, and that undeniable beauty that only a true penetrating oil stain can provide.
There are a few different ways you can tackle this. To save you time, here is how we recommend doing this, and how we have served happy clients for years in our own business. This is especially important to know, because you’ll be able to get away with stain reapplications without sanding again for years (perhaps forever) using these tools, techniques, and products.
NOTE: The process for finish staining pressure treated wood is the same as staining cedar—however, the prep is very different. If you have pressure treated wood, check out our post 5 Reasons You Should Never Sand Pressure Treated Wood here to make sure you do it right the first time.
What You’ll Need
Applicators
There are several ways you can apply stain to a deck, fence, or wood surface. Here is a list of what we’d recommend using, and use ourselves from the Sand & Stain System.
Staining Block Brush
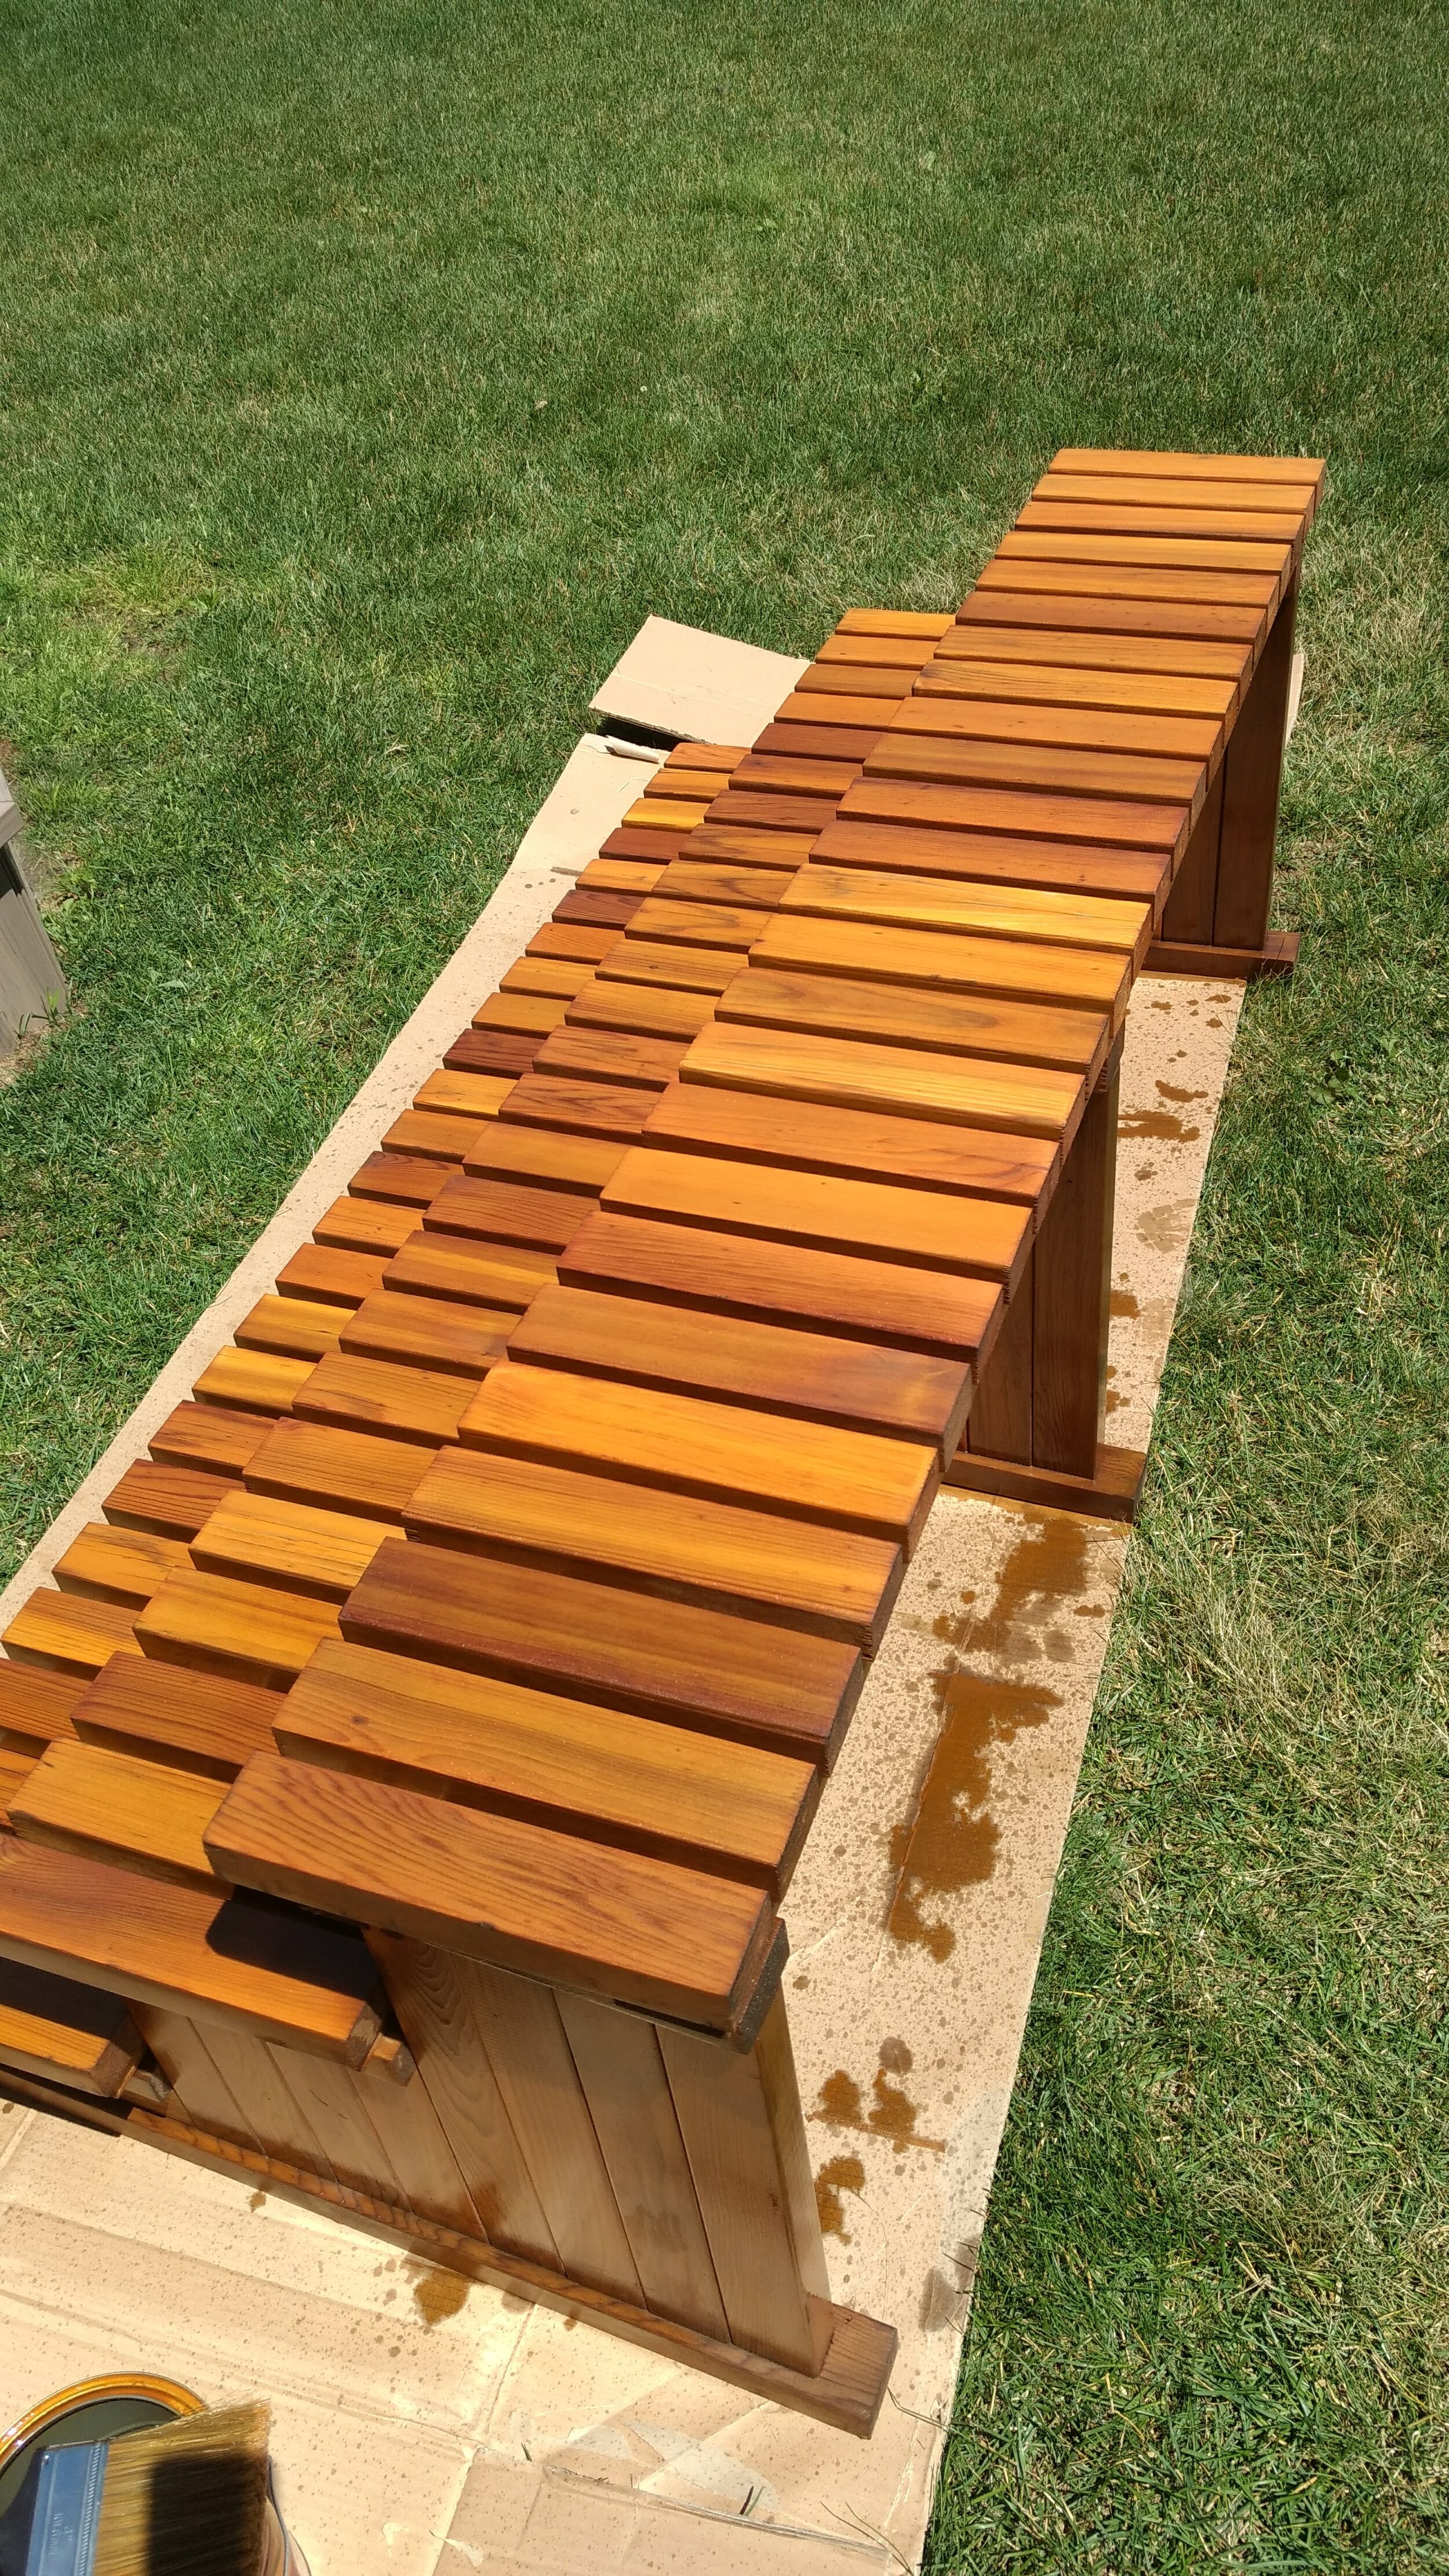
A proper staining brush, also known as a staining block, will be the item you’ll need in basically any of the application methods you choose. It’s important to use a thick staining brush with natural, mixed bristles opposed to nylon for faster application and easier to manually push the stain into the wood.
Mixed bristles will hold the stain better in the brush for less drip potential and allow for longer spreading time before reloading, making it work more efficiently and save you time over the entire project.
You can get stain brush in various sizes. Perhaps the most useful is the 4” brush as it can easily fit into 1 gallon cans. You can purchase the staining brush we use here.

Wood Staining Block Floor Applicator
A wood staining block floor applicator is a great way to apply penetrating oil stain much faster, and much more comfortably as it is used standing up, saving yourself from pain or fatigue in the lower back or knees.
The wood staining block is a wide wood block (typically 10”) that is wrapped in lambskin wool to hold a ton of stain lasting incredibly long in between reloads. It is screwed onto a standard pole or extension pole and applied like a square floor mop, along the grains of the wood, carefully spreading the stain without allowing pooling or build up.
Because the wood block is so wide, you’d need a paint tray or similar device to dip stain from as it is far too big to evenly fit into a stain gallon.
NOTE: This specific wood staining block is a floor applicator and is not recommended on vertical surfaces.
Lambskin Wool Pad Refill
Lambskin wool is the cleanable and refillable applicator pad that attaches to the wood staining block floor applicator (mentioned above.) Typically, your wood block will come with a lambskin wool pad, but you can purchase the refills without needing to purchase additional wood blocks.
These heads do an incredible job spreading stain quickly and evenly, keeping in mind that less is more and know to push the stain as far as it will go before needing to reload.
If the decking floorboards have large gaps in between then, you may want to consider doing the first stain application with a staining block brush to get into these hard to reach areas. The bristles can be manually pushed in between the boards, whereas the lambskin wool is flat and pushed along via pressure from the wood block as you guide it with the pole.
Sprayer
Sprayers can be used for stain application which can speed up the process, but may take some time getting used to and setting up the right settings such as adjusting the fan width and volume of stain that ejects when the trigger is engaged.
For a clean finish without overlap marks or needless imperfections, it is required to backbrush after spray application to rid of any runs, drips, or splatter. This needs to be done immediately while the stain is still wet.
If you’re a contractor, a sprayer might be a good investment for your business. If you’re a DIY, a sprayer is highly unnecessary, and could pose more risk than anything, plus the learning curve and time to properly clean, rental fee, etc.
We do not use sprayers at Sand & Stain, but do acknowledge their potential—especially for fences, siding & log homes/cottages/cabins, and large deck floors. We find that manually pushing the stain in the wood does a better job and leaves a cleaner finish—even with a powerful penetrating oil stain product.
Roller
We generally do not recommend rollers. Small Whizz rollers, typically used for painting details and trim, can be used on a long or pole extended roller cage in extremely hard to reach situations that are awkward for a brush, but overall should be avoided.
Rollers can be messy and leave overlap marks and often leave buildup of excess stain at the edges of the roller. Problems are likely to occur when used too quickly, and especially when used with a thin product such as the penetrating oil stains we recommend that can over spray and leave wanted drip marks on your siding, etc.
NOTE: Avoid using a roller to apply penetrating oil stain when possible
Rags
Rags are extremely useful for more viscous penetrating oil stains, typically used for exterior hardwood and specialty woods such as Ipe and Thermory Ash.
Common instructions are to apply stain with a brush, allow time to penetrate for 20-30 minutes, and wipe off excess stain with a rag. Another method is to apply with a wet rag and wipe with a dry rag, or simply manually apply and wipe excess with one rag.
Refer to each specific product application for best results.
NOTE: Be sure to properly dispose of your rags when using penetrating oils with certain ingredients such as linseed oil to avoid possible chance of spontaneous combustion.
Safety Equipment
Safety equipment is a bit more obvious, so for the sake of simplicity, here is a list of items we recommend using while staining a deck to prevent injury and encourage ease. Please consider purchasing items you require conveniently located at our online Stain & Supply Shop.
Safety glasses
Dust & vapour mask
Oil resistant gloves
Sun hat
Knee pads
Other Tools & Equipment
Here is a list of additional tools and equipment you may find helpful and solve problems before they occur.
Stir Stick
Do not underestimate this crucial step! Many coatings, true penetrating oils included, are formulated in such a way that allows them to separate over time in the container—even when properly sealed. Prior to, and during use, shake or stir as needed according to the label—especially in colder temperatures in early spring or fall when chemical separation is more likely.
Use the stir stick to not only stir the contents of the can, but actively scrape the bottom to loosen and break up and potential build up of pigment, etc. This simple step can change the colour of your stain to allow it to spread more consistently.
Another trick is to stir several gallons and then mix them together for the best chance of even colour. Continue to stir often throughout application—every 20 minutes or so is a safe bet.
Drop Cloth
The saying better safe than sorry can truly be practiced with the use of drop cloths. Our team uses them without question. It has less to do with skill or clumsiness, and more to do with the chance that accidents can happen to anyone.
You certainly do not want to battle the power of a penetrating oil soaking into you beautifully installed (not to mention expensive…) patio stones when it could have easily been prevented with a drop cloth.
This is true without exception, but especially handy for pergolas, lattice privacy fences, and second storey decks and patios that have potential for drips to fall underneath.
Check out the laminated leak proof 4x12 drop cloths we use on all of our local staining projects.
Pro DIY & Contractor Tip…
Never pull or drag a drop cloth while your stain can is still on it!
Not only is it a potential spill hazard, but with such a thin penetrating oil, even tiny drops with sudden movements could allow for small drips to jump out of the can and leave drip marks that will overlap later after application.
Wood Moisture Meter
This is an extremely handy tool to make sure you’re not staining when it’s too wet in the spring melt, after a rainfall, or the cool fall. By now you know we only recommend using true penetrating oil stains and avoid hybrid and water based stains, and especially solid / opaque stains.
It also can be used for numerous other needs like checking for moisture in your basement, leaks in your roof, checking surfaces before tiling, painting, plastering, etc.
With this, it’s important to know the only reason a penetrating oil would fail (besides improper prep work—see How To Sand A Cedar Deck - Part 1 of the Sand & Stain System) is if applied to wet wood.
Mineral Spirits
There are many benefits to penetrating oils, but perhaps the one area that is less appealing is the cleanup. To properly clean your brush, staining block, lambskin wool refill, rags, or sprayer, you will need a thinning solution such as mineral spirits to help get the stain out of the applicator so it can be used again.
Pro DIY & Contractor Tip…
If your project takes a few days to complete and is being worked in the heat of summer, you can get away with putting your brush in a large freezer bag and sealing it from oxygen to keep for the next day.
If it’s kept warm enough, the brush shouldn’t harden and you can use it again the next day without issue. Make sure to clean it with mineral spirits if you are changing between stain colours in your project.
Stain Can Opener
This one is pretty self explanatory… Worth noting if it saves someone bending their house keys like I’ve done in a pinch!

Deck Staining Order Of Operations
The order in which we stain may vary in some cases, but for the most part will be the same: the highest points, and vertically facing trim first, then ending with the floor or skirt in such a way that you don’t trap yourself without an exit and are forced to step on freshly stained areas.

As mentioned before, do not start staining if any wood surfaces are wet—or better yet, use a wood moisture meter to make sure, especially after recent rain.
In a perfect world, there would be no rain between sanding and staining. If it does rain heavily, it’s best to go back to scuff sanding to make sure the grains are open and ready for your penetrating oil stain and filled with water.

These descriptions should give you technical insight, and the science is certainly important—however, do note that finish staining is much like an art. Have fun when you’re doing this! The staining should be the relaxing and satisfying part of the job after the prep sanding.

Pro DIY & Contractor Tip…
Brush Technique. When using a 4” stain brush, try unloading the stain along the narrow (1”) side of the brush followed by smoothing it with the wide 4” side of the bristles. This lowers the possibility of thin areas or missed spots.
You’ll likely do this same ‘narrow angle’ brushing technique without even thinking about it when shoving the brush in between boards or narrow trim pieces like spindles.
The following is the order we recommend staining a deck with noted tools from above for each step.
1) Trim, Overhead, & Hard To Reach Areas
Much like while prep sanding, we shall stain in a process as efficient as possible. This means starting with the highest areas or areas that will be the hardest to reach. All decks are different and not all will have the various trim pieces, but here are a handful of possibilities listed as examples:
Rafters and posts on a pergola
Privacy fence panels
Spindles
Railing and posts


These trim areas will typically be done with a staining block brush—potentially a sprayer for contractors and DIYs with access to one. Make sure to use a leak proof drop cloth on your deck floor and patio stones—even plants and other decorative areas that are important to protect from permanent drip stains.
NOTE: Leave any trim like steps and step risers until later or the very end if it means you would have to walk on wet stain to go back and get other areas.

Make sure to always stain along the grain of the wood, smoothing out areas for even finish and to prevent pooling as you go. This is definitely a less-is-more strategy. Piling the stain on is definitely not the way to achieve more protection. Much like the name suggests, penetrating oils protect from the inside by keeping the wood hydrated to prevent it from premature decay, rot, etc.
Once you have started staining a wood plank or trim piece, do not take a break until the entire piece of wood has been stained to prevent overlap marks. Even a minute or two can start to create an overlap mark, so don’t start staining more pieces of wood than you can handle.
This could mean one spindle at a time, one pergola rafter at a time, one part of the railing at a time, etc.
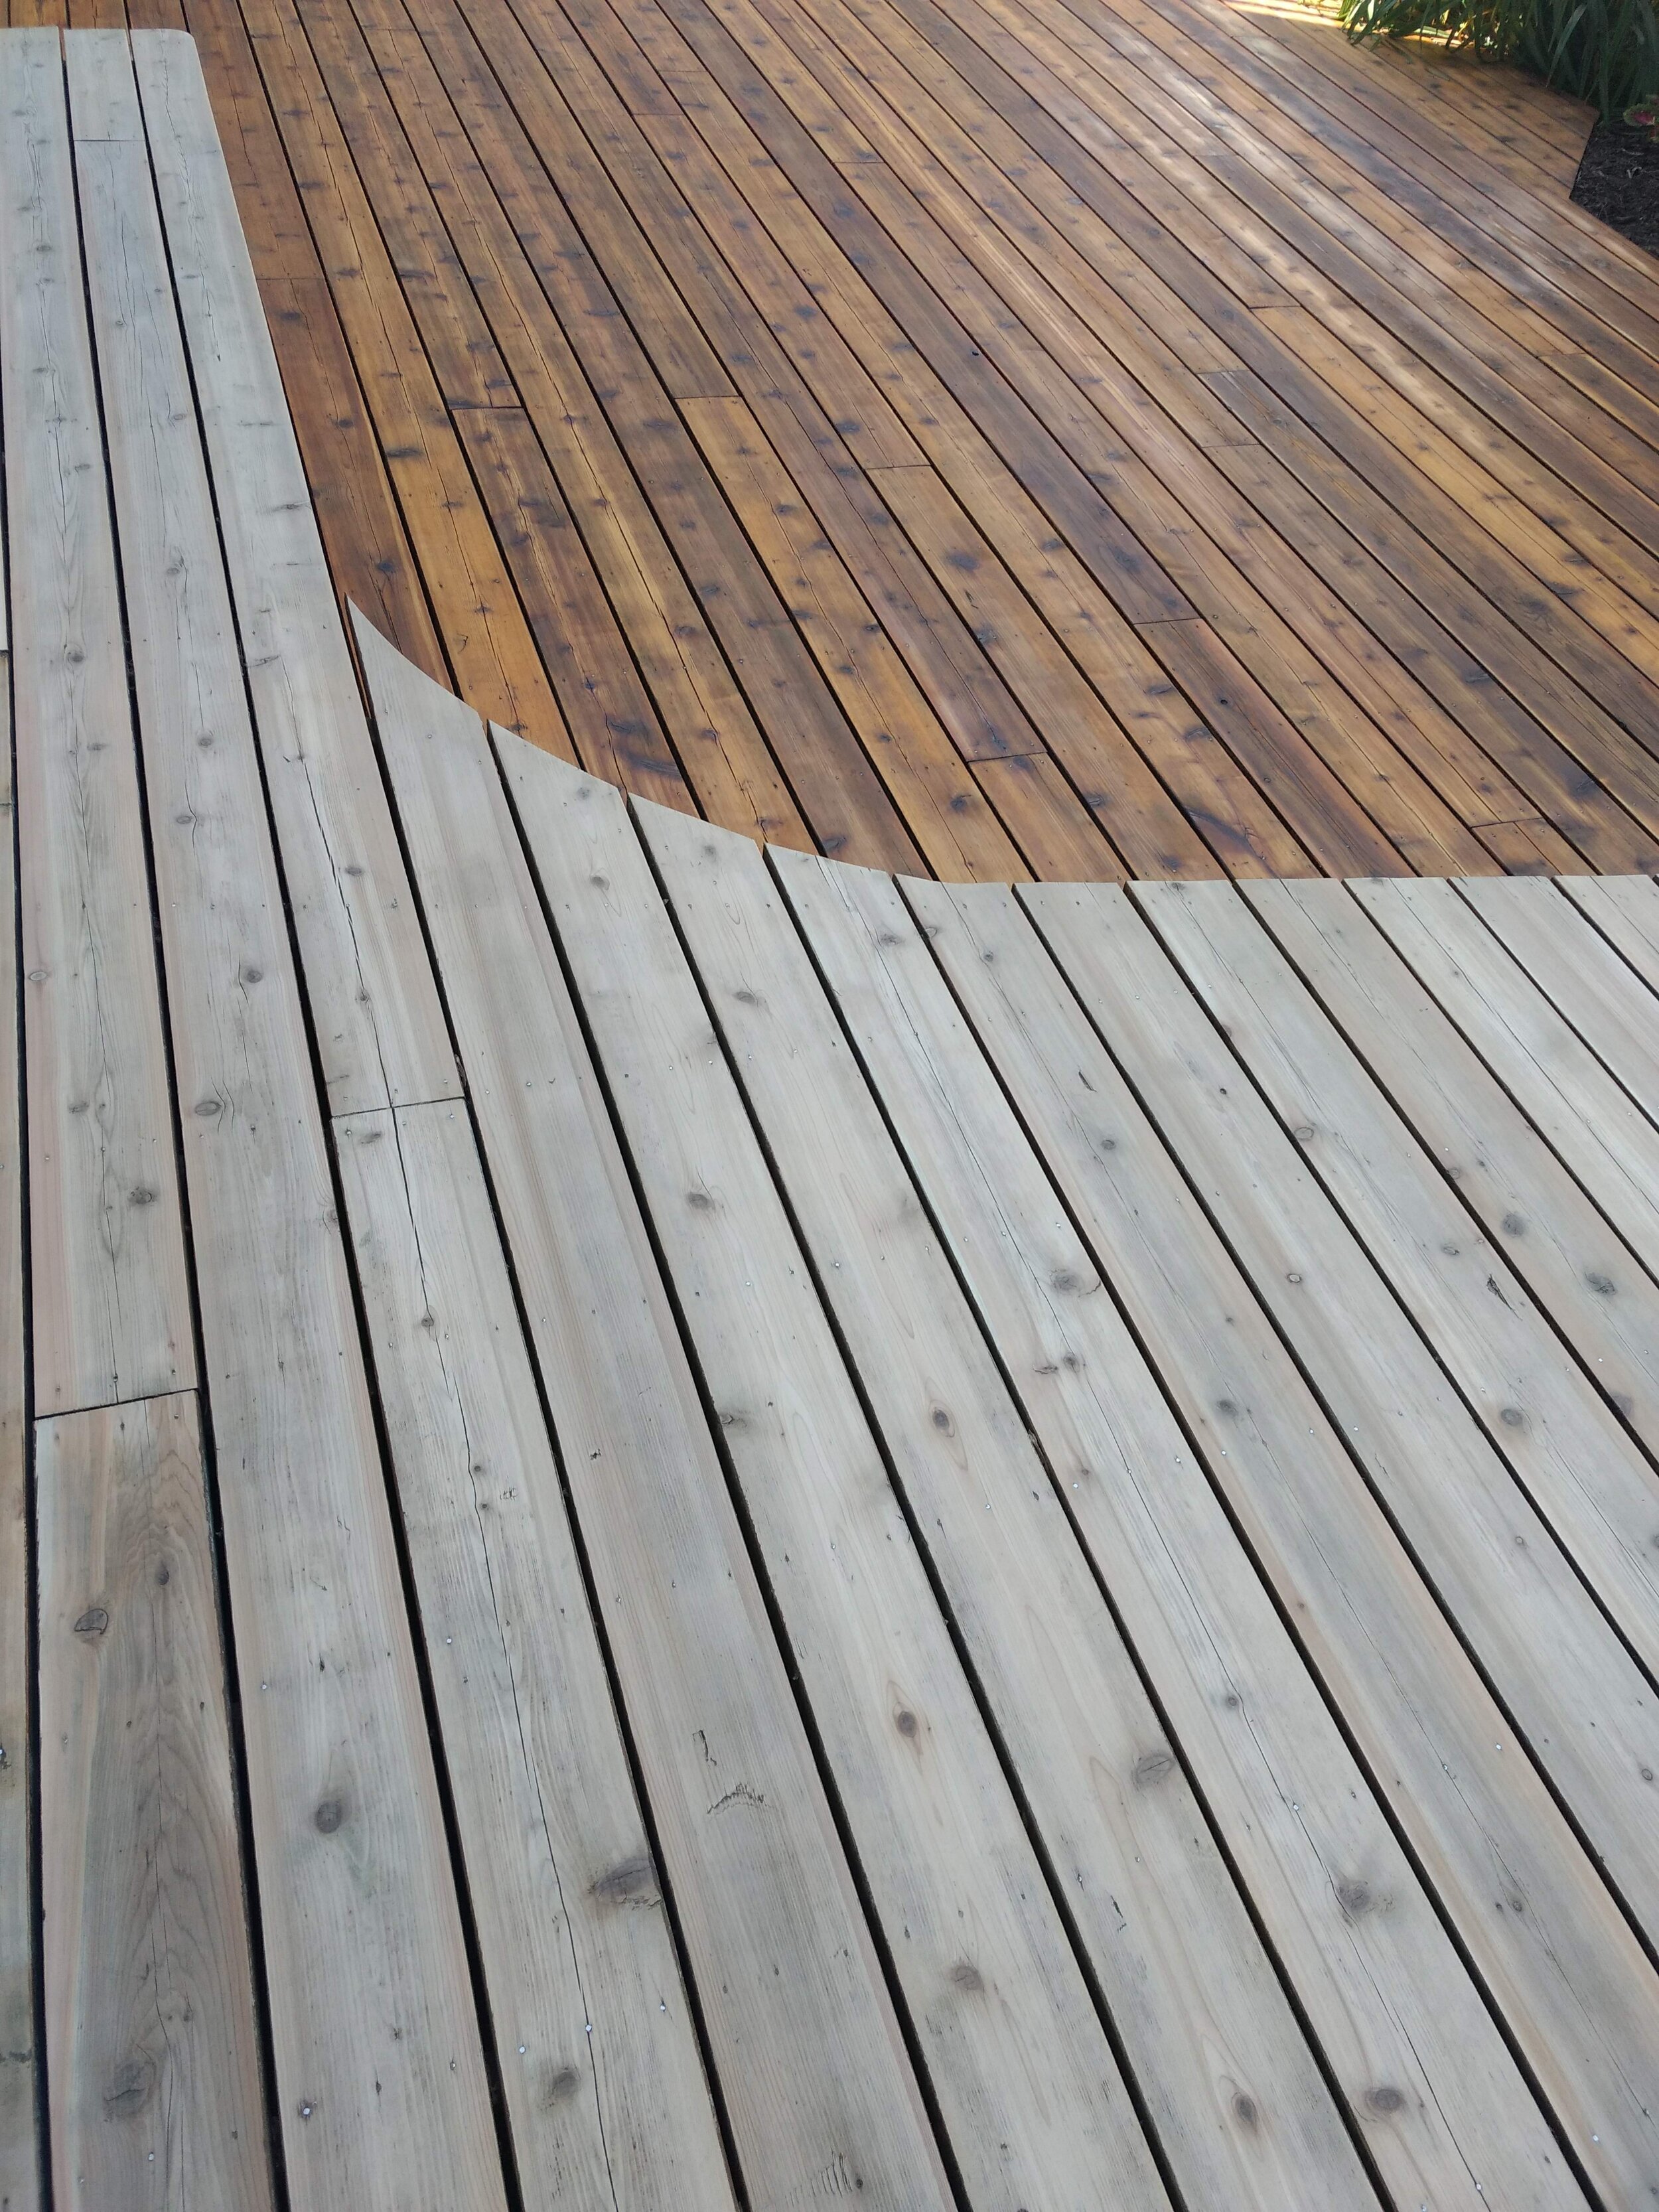
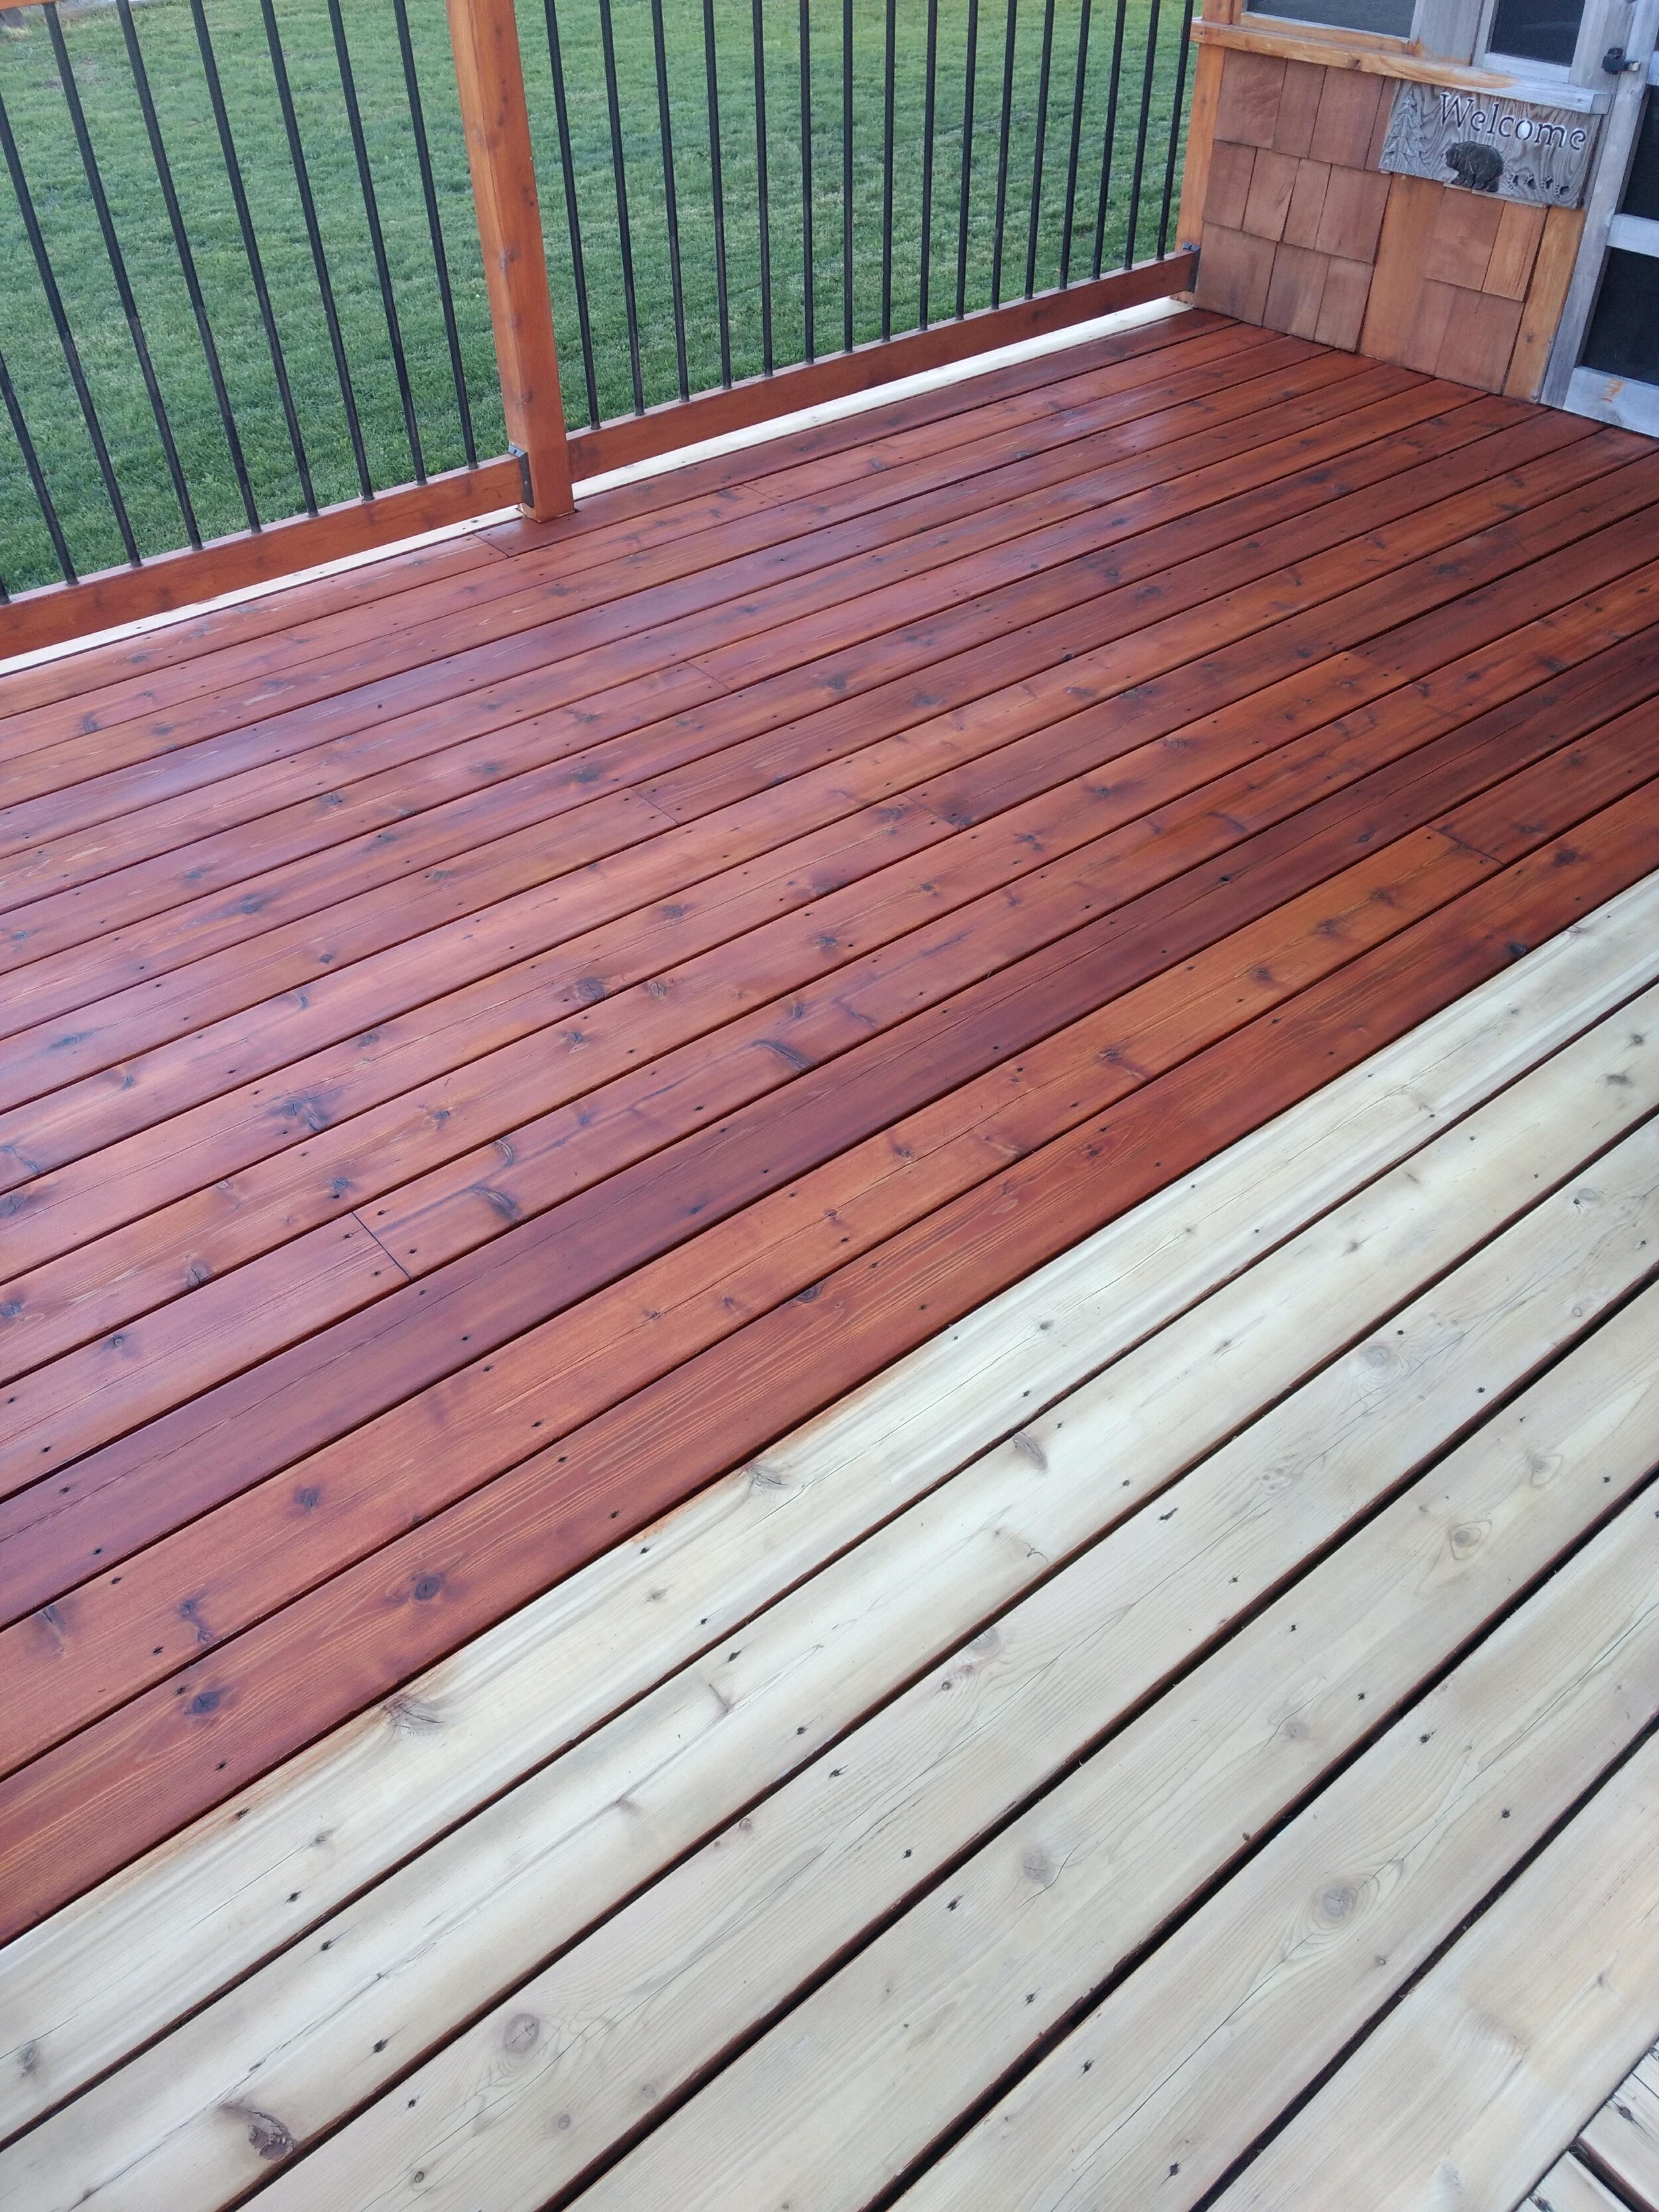
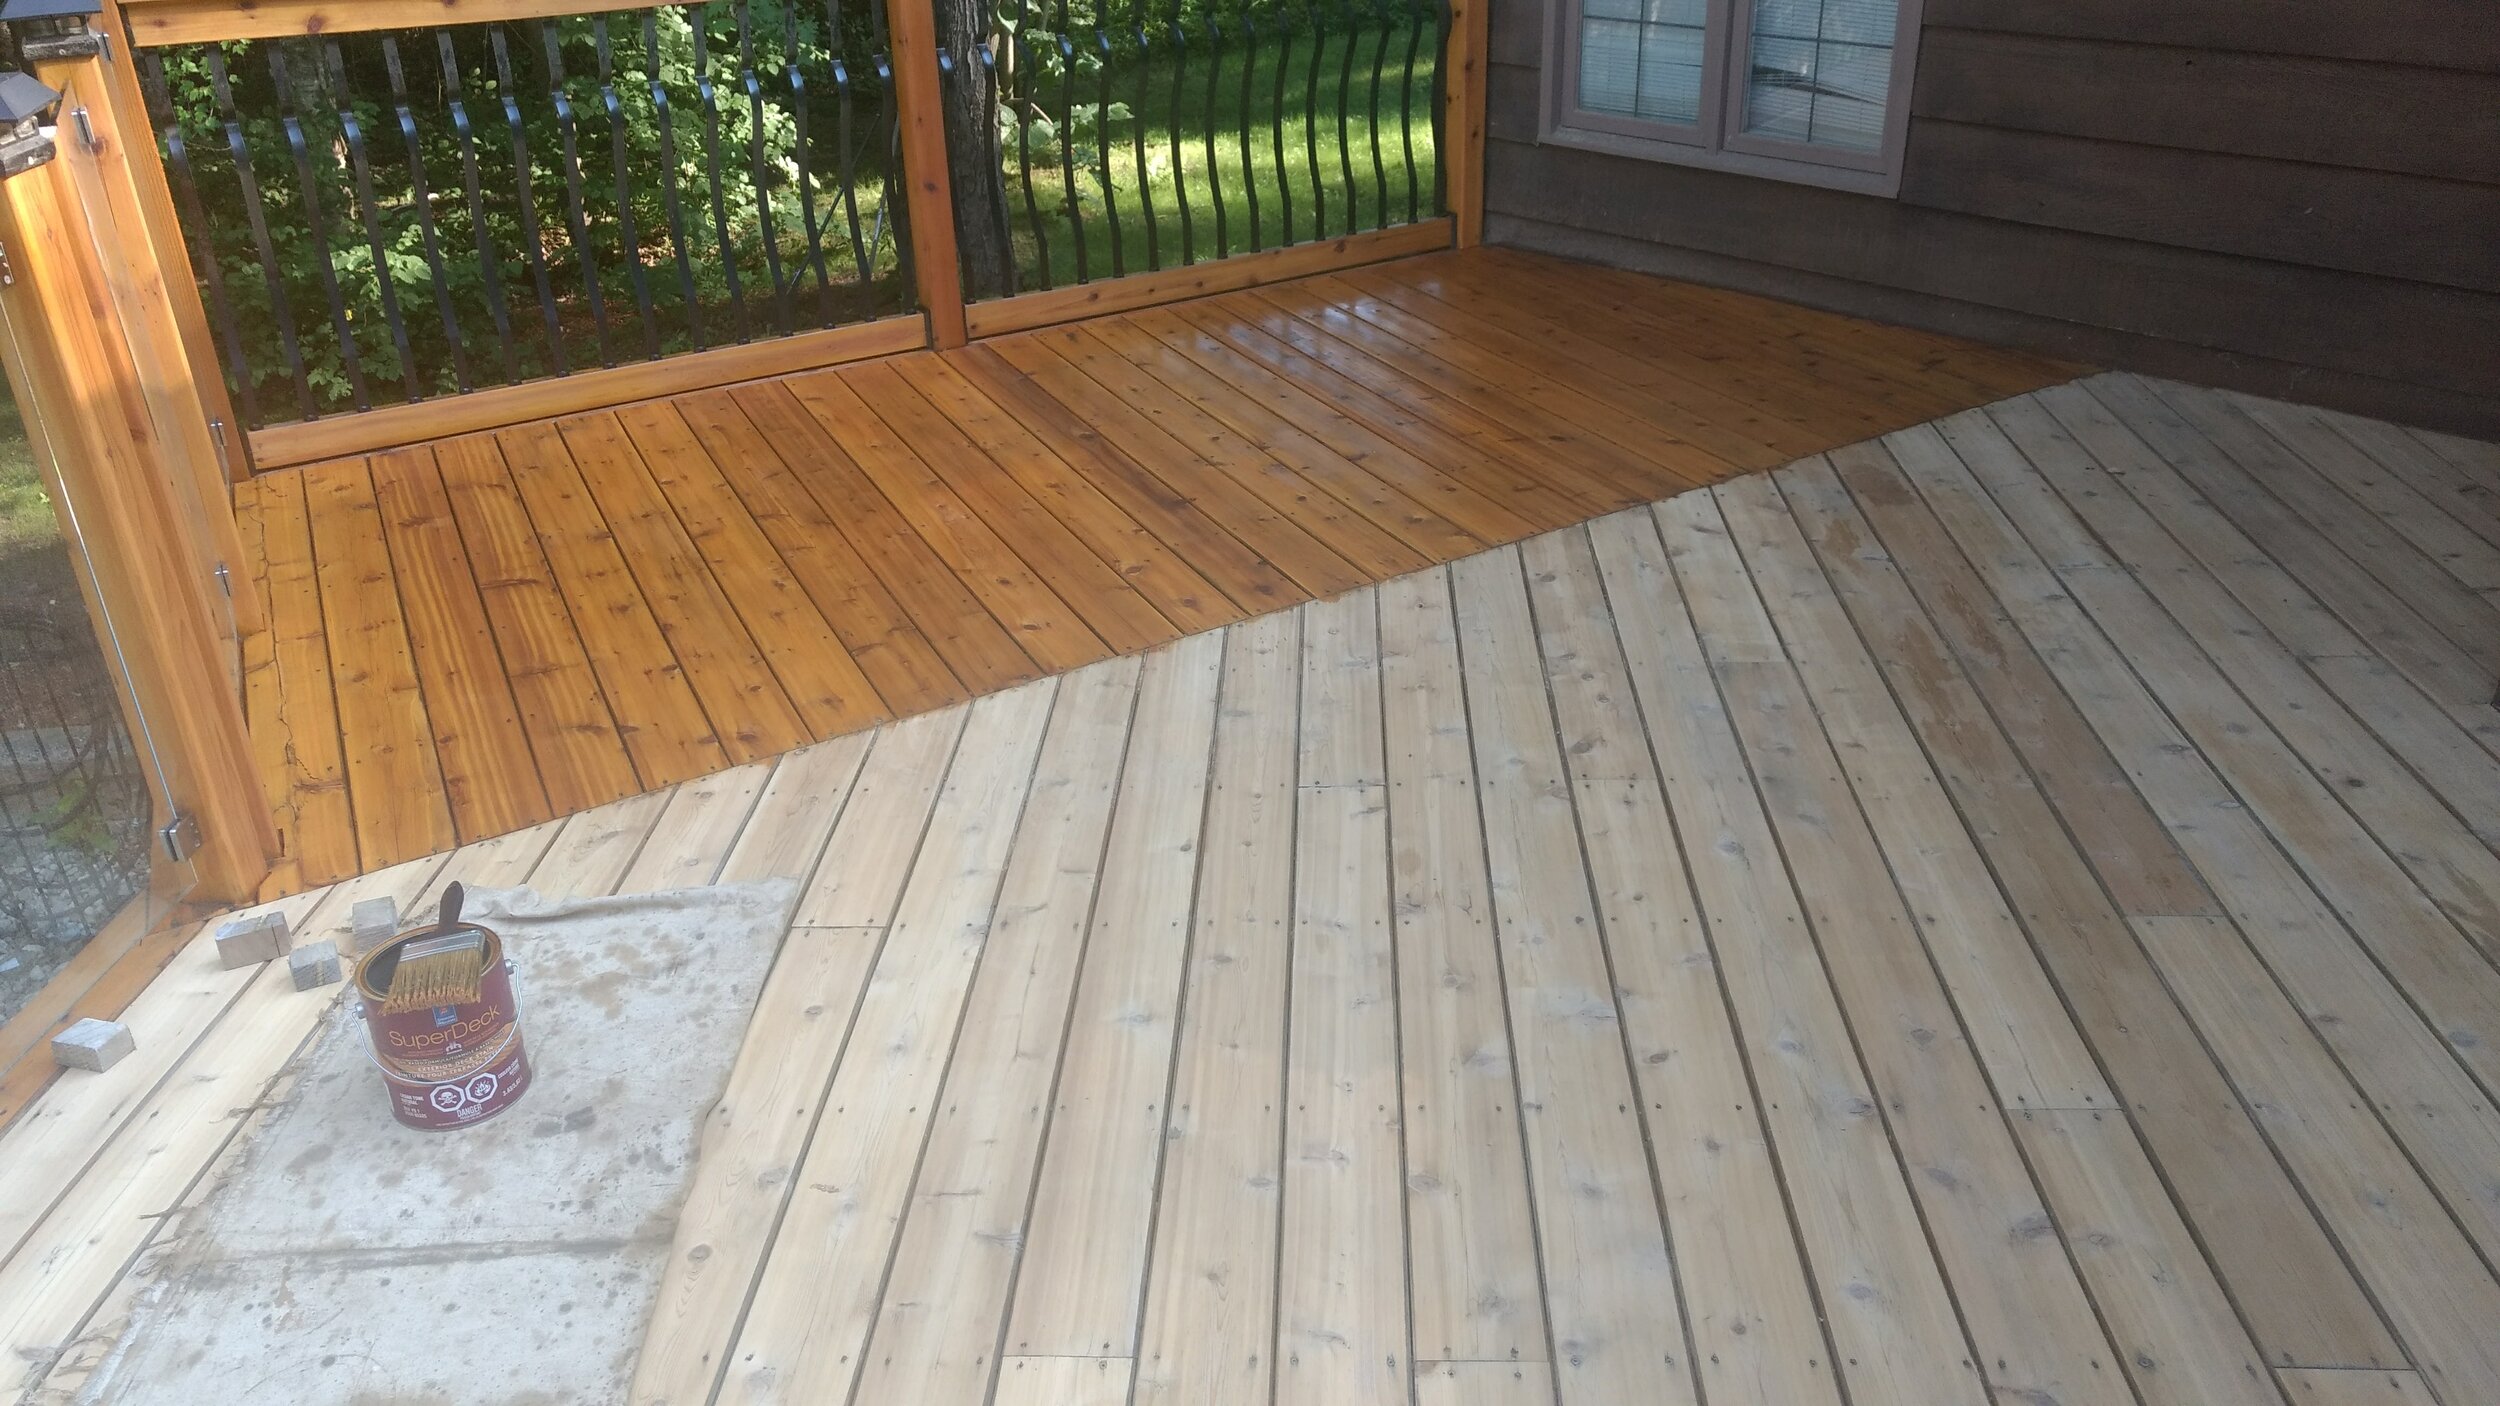
2) Deck Floor, Steps, & Skirt
After all trim, overhead, and hard to reach areas are stained, you should be left with the deck floor, plus steps and skirting if applicable. Make sure to plan the floor staining in a way that you can continue to stain the full plank to avoid overlaps while leaving yourself a way to exit the job without stepping on fresh / wet stain.
This could mean doing the steps last after the floor, or exiting back into the house if an apartment balcony or second storey patio. Otherwise the deck floor is often the last thing that gets stained.

You may choose to stain the skirt last after the deck floor. This might be because full access is available to reach from the ground and no need to have the floor available as a path.
Also, if the skirting boards are installed in a way that they touch mulch, pulled back stones, garden soil, grass, or other materials that can dirty the brush, you may want to keep the skirt for last after the deck floor.
Pro DIY & Contractor Tip…
When staining a deck floor with a staining block brush, we typically stain three boards at a time—always along the grain, and always only working on boards that can be started and finished in one go before taking a break or needing to stop.
This three board technique allows for a decent pace while still allowing for enough reach room to smooth out or correct any issues without needing to step on the stain.
Remember, less-is-more with penetrating oil stains, however, we are only applying one coat with this, so it’s also important not to miss any spots either. Again, the three boards allow enough room to reach to catch any missed or thin spots.

Pro DIY & Contractor Tip…
Similar to sanding, you may prefer to finish your spindles if they are already removed from the deck railing, as long as you have a place to dry them so they don’t leave any marks.
If you prefer or have no good place to let them dry, you can screw the spindles back in before staining.
If you are doing a strict recoat (and didn’t remove the spindles), this should be easy enough to simply apply stain where they are without uninstalling them.
Read the next post: How To Maintain Your Deck So It Never Peels— Part 3 of the Sand & Stain System.
In case you missed it, here’s: How To Sand A Cedar Deck—Part 1 of the Sand & Stain System.